

Run your first payout
A start-to-finish walkthrough — import a billing file, write one pay rule, and close out a pay period.
Last updated: August 9, 2026
This walkthrough takes you from an empty account to a finished payout. Set aside about fifteen minutes. You will need:
- a login for Track 2 Pay with the Owner or Editor role — if you are not sure, you have it if you can see Payout Conditions in the top menu;
- one billing export as an XLSX spreadsheet, covering a period you have not paid yet.
Nothing here is irreversible until the very last step, and that step tells you so twice.
Step 1 — Import your billing data
Go to Transactions and click Import Transactions in the top right. (Or just drag the file anywhere onto the page — an import starts straight away.)
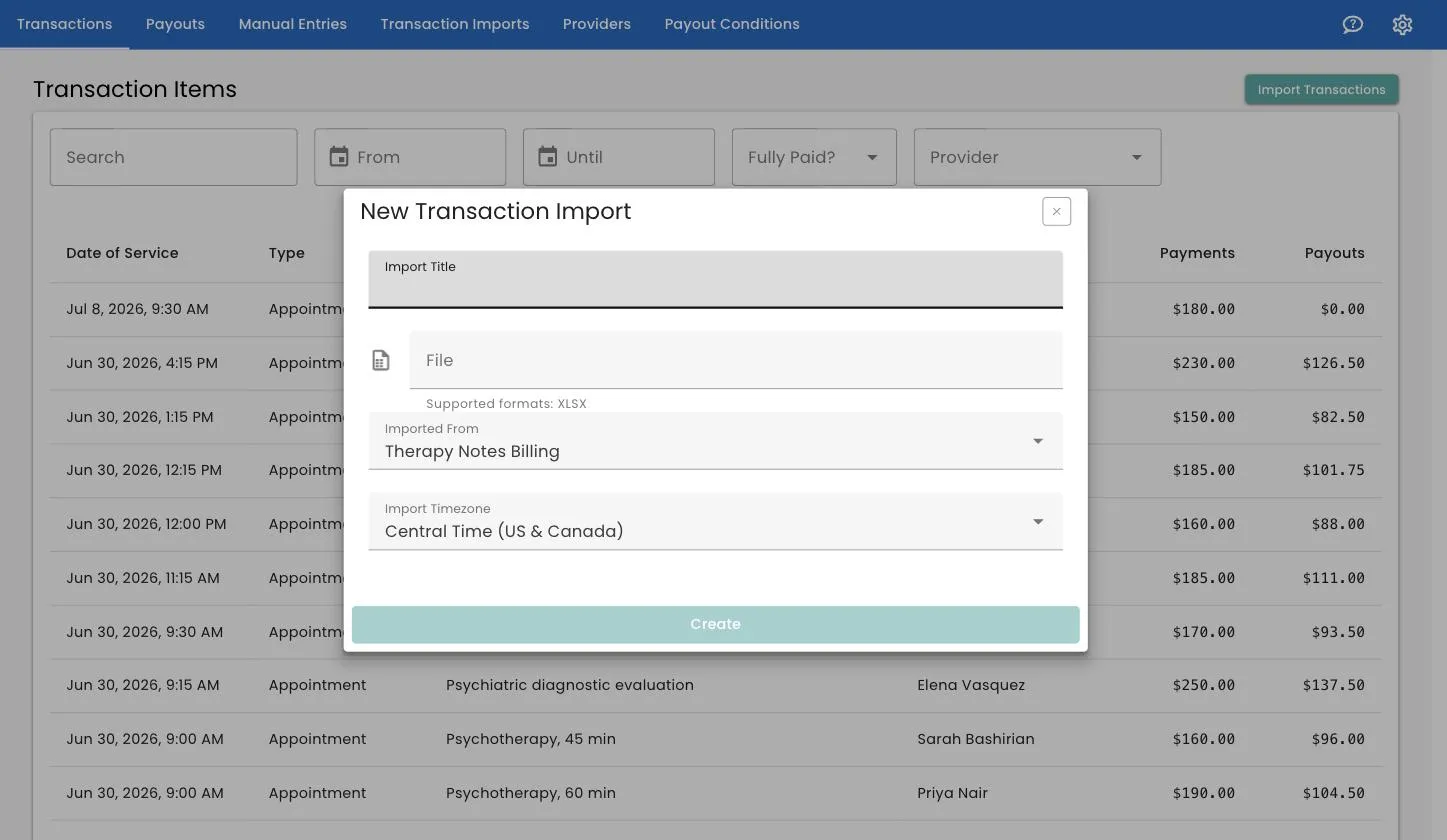
Fill in four things:
- Import Title — a name for your own reference. It fills in from the filename, so you can usually leave it.
- File — your spreadsheet. XLSX only; Track 2 Pay will not accept CSV or PDF.
- Imported From — Therapy Notes Billing if this is a TherapyNotes billing export, otherwise Generic. Get this wrong and the import will fail, harmlessly, with an error.
- Import Timezone — the timezone your practice’s dates should be read in. It defaults to your account’s timezone, so you can usually leave it. It decides which pay period a late-evening session falls into.
Click Create. You will be asked to confirm which account the file is going into — worth a second look if you manage more than one practice.
The import runs in the background with a progress bar. When it finishes you will see a summary of how many transactions and payments were new versus updated.
This is safe to repeat. Uploading the same file twice does not create duplicates. Track 2 Pay recognizes records it has seen before and updates them. See re-imports and adjustments.
Go back to Transactions and you should see your sessions listed, each with the clinician, the date of service, and what was collected.
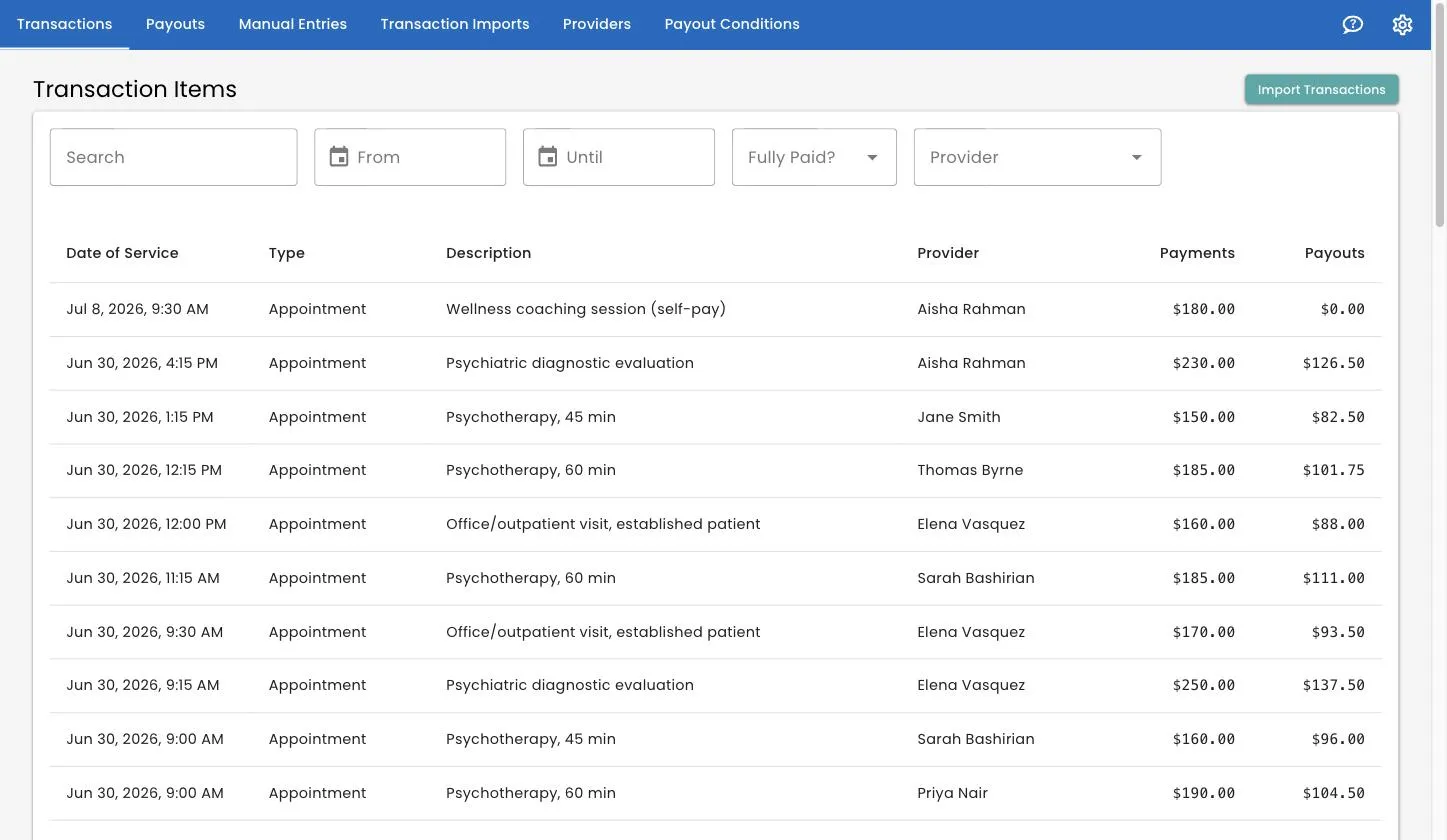
The Payouts column reads $0.00 for everything at this point. That is correct — you have not told Track 2 Pay how anyone gets paid yet.
Step 2 — Check that your clinicians came across
Go to Providers. Every unique clinician name in your file has become a provider record automatically. You do not create these by hand.
Have a quick look for the same person appearing twice under slightly different names. If that has happened, it usually means your billing system has them under two spellings — worth fixing at the source before you go further.
Step 3 — Write one pay rule
Go to Payout Conditions and click New Payout Condition.
Give it a name you will recognize later — Standard commission (55%) is more
useful in six months than Rule 1. Click Create.
The condition opens for editing, and starts out disabled so you can set it up before it affects anything.
For your first rule, make it a catch-all that pays everyone the same:
- Under Conditions, add one rule: What to match? → Provider
Transaction Count, Comparison → Greater Than, Value →
0. Every clinician has at least one session, so this matches everything. - Set Payout Percent to whatever your standard rate is — say
55. - Tick Enable.
- Click Update Payout Condition.
That is a working pay rule. Later you will add more specific ones above it — one clinician on a different rate, group sessions at a lower percentage — and Track 2 Pay uses the first one that matches, so specific rules go above the catch-all.
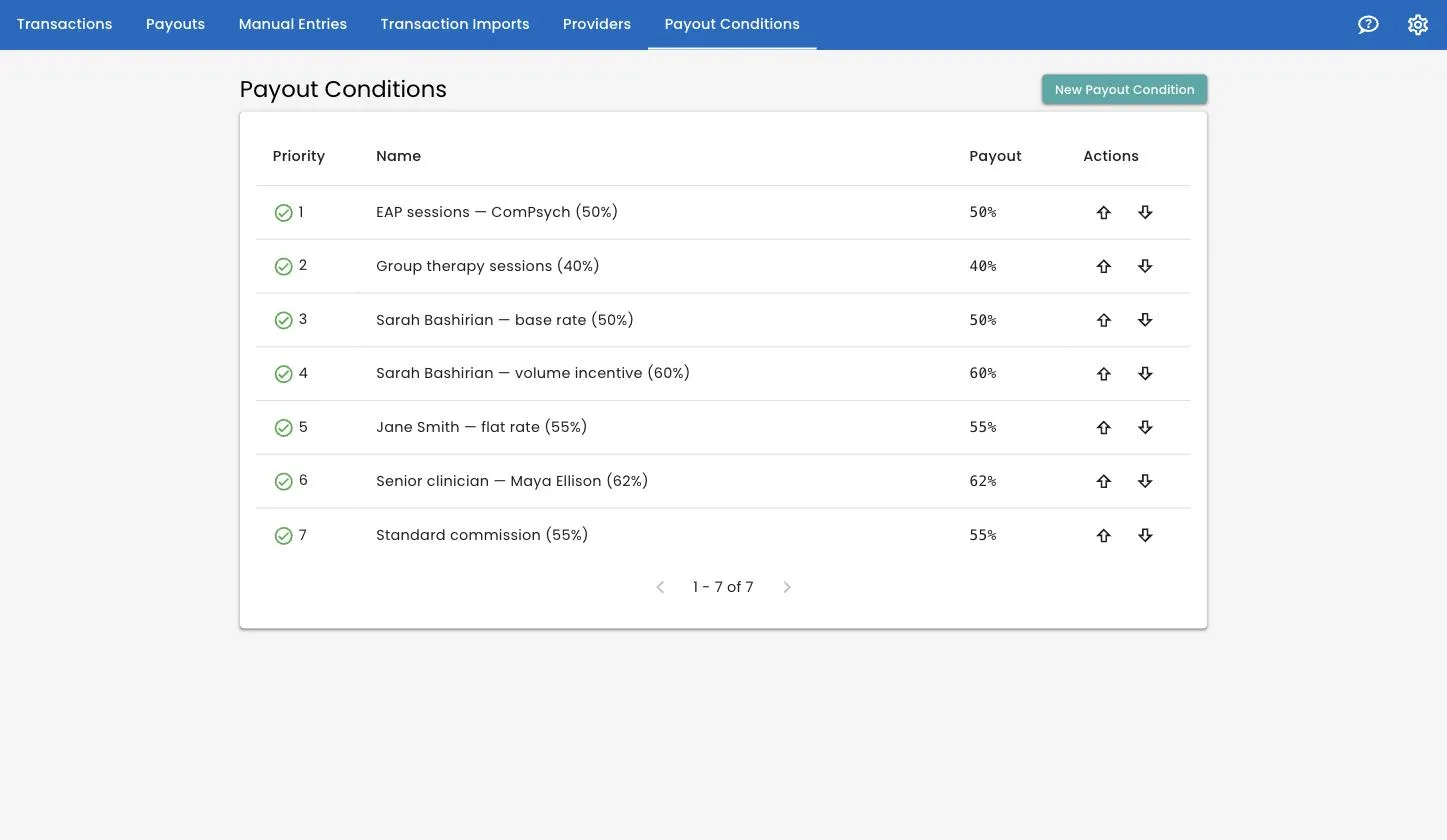
There is more on this in payout conditions, including how to reorder rules and how to pay different rates by service code.
Step 4 — Create the payout
Go to Payouts and click New Payout Batch.
- Description — how you will refer to this period.
June 2026 PayoutsorWeek of June 15both work. - Service Start Date and Service End Date — the range of session dates to include, not payment dates. Track 2 Pay suggests a start date that picks up where your last payout left off.
Click Create. Track 2 Pay pulls in every eligible transaction and works out what each clinician is owed, with a progress bar while it runs.
If a warning appears about transactions that still need a decision, that is an integrity check doing its job. You can go and resolve those now, or carry on and deal with them next period — see integrity checks and sessions removed in TherapyNotes.
Step 5 — Check the numbers
The batch opens in Draft. Nothing is committed and you can re-run or delete it freely.
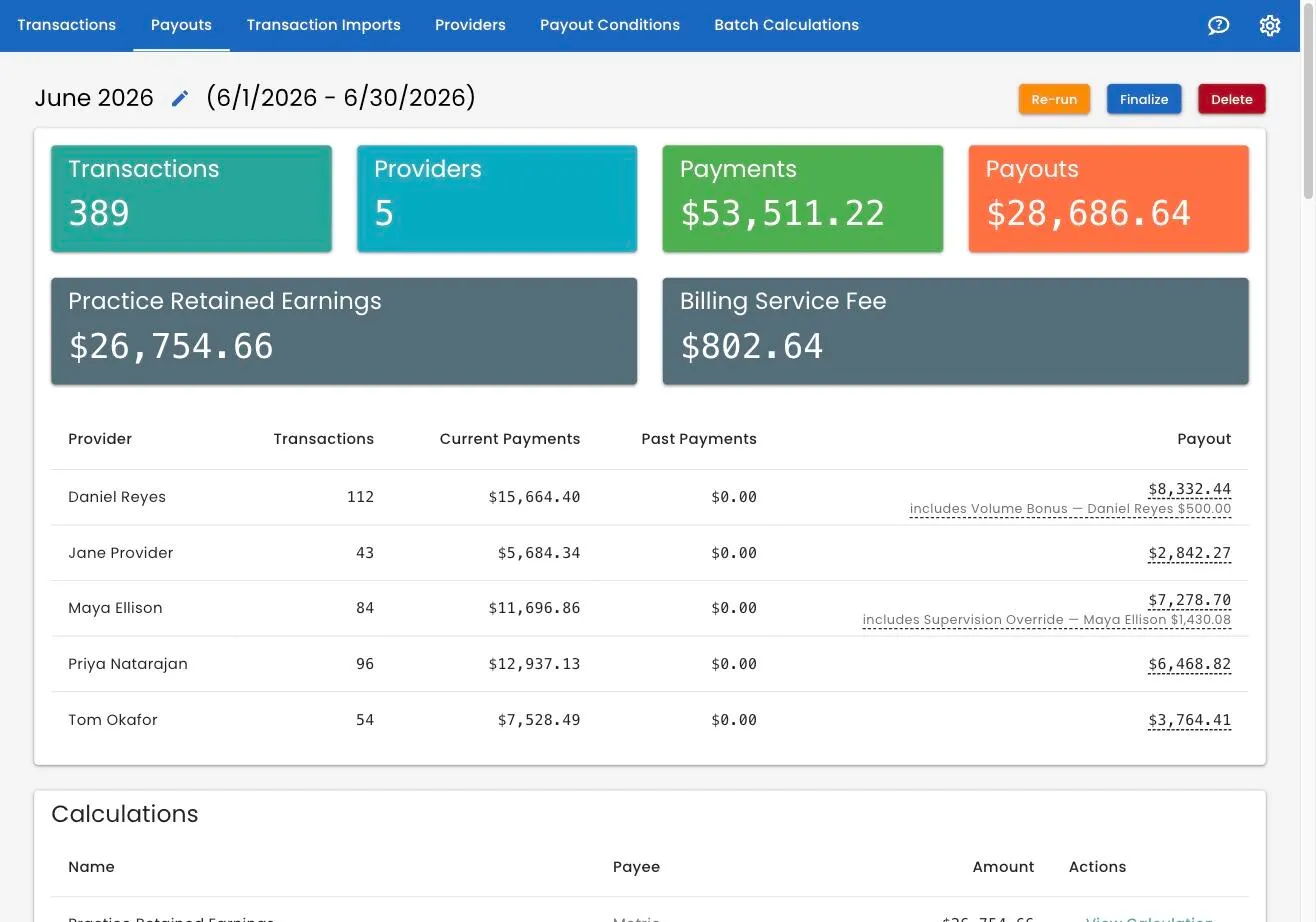
Across the top you get the headline figures: how many Transactions, how many Providers, total Payments collected and total Payouts owed.
Below that, one row per clinician. This is the table to check. Does the count of sessions look right for each person? Does the total feel like the right order of magnitude?
Handy: click a clinician’s payout amount and it copies to your clipboard, ready to paste into payroll.
Further down is every individual line: which rule applied, the date of service, the session, what was collected and what is owed. Filter it by clinician or by rule if something looks off.
If it does look off, fix the pay rule and come back and click Re-run. The whole batch recalculates against your current rules. Re-running works on drafts only — which is exactly why you check before finalizing.
Step 6 — Finalize
When the numbers are right, click Finalize. This is a two-step confirmation, because it cannot be undone.
Step one asks whether to publish the snapshot. Leave it ticked and each clinician with a login will be able to see their own total, and only their own. Untick it and the numbers stay internal to your team.
Step two asks you to confirm you have checked the details. Tick the box and click Finalize.
That is a closed pay period. The amounts are locked, every included session is marked as paid for, and the audit trail records what was calculated and why.
Finalizing cannot be undone. You cannot edit or delete a finalized payout. If you are unsure, stay in draft and re-run as many times as you like — that is what draft is for.
What happens next month
Most of that was one-time setup. Your ongoing cycle is:
- Import the new billing export.
- Clear anything the integrity checks flag.
- Create a payout for the new dates.
- Check the per-clinician table.
- Finalize.
Your pay rules keep applying until you change them. If a clinician’s rate changes, edit the rule — and note that finalized payouts keep the rate that was in force when they were run, so history stays accurate.
Where to go next
- Importing from TherapyNotes — what Track 2 Pay reads from the export, and what it ignores.
- Payout conditions — different rates per clinician, per session type, per service code.
- Batch calculations — supervision overrides, bonuses and fees, worked out once per pay period.
- Integrity checks — how duplicates get caught before they cost you money.
- Team and roles — inviting your bookkeeper or your clinicians.
Still stuck? Open the Help menu in Track 2 Pay and choose Support, or read how to get support.